Monday, 22 May 2017

what is kotlin

Kotlin is a official programming language to develope android application. Google announce that in Google io 2017.
Kotlin is a programming language that rung on Java Virtual Machine. Kotlin is designed by JetBrains.

To see difference between java and kotlin click below link.
https://kotlinlang.org/docs/reference/comparison-to-java.html

Simple difference between java and kotlin language.


Before going to develop app using kotlin first you want to download Android Studio 3.0 Canary or you can also add Kotlin plugin to your existing Android studio.

To install kotlin plugin in your android studio follow below steps

Go to File => Settings.

From left side panel choose plugin => now select Install JetBrain Plugin => now search kotlin from search bar.

You see kotlin plugin listed in below window. Now in right side on window press Install button.

See following video to install kotlin plugin.


To download Android studio canary version click following link. https://developer.android.com/studio/preview/index.html

Saturday, 20 May 2017

How to create Splash screen in android

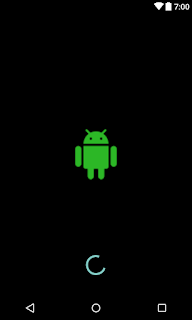
Android splash screen are normally used to show user some kind of progress before the app loads completely or show company logo.


splash screen demo
Splash Screen


First create android project in Android studio and give activity name as Splash.

Now Paste following code in your activity_splash.xml file.

<?xml version="1.0" encoding="utf-8"?>
<RelativeLayout xmlns:android="http://schemas.android.com/apk/res/android"
    xmlns:tools="http://schemas.android.com/tools"
    android:layout_width="match_parent"
    android:layout_height="match_parent"
    android:background="@color/black"
    tools:context="com.app.splashscreen.SplashActivity">

    <ImageView
        android:layout_width="100dp"
        android:layout_height="100dp"
        android:layout_centerInParent="true"
        android:src="@drawable/ic_android"/>

    <ProgressBar
        android:id="@+id/progressBar"
        style="?android:attr/progressBarStyle"
        android:layout_width="wrap_content"
        android:layout_height="wrap_content"
        android:layout_alignParentBottom="true"
        android:layout_centerHorizontal="true"
        android:layout_marginBottom="38dp" />
    
</RelativeLayout>


Now Paste following code in your Splash.java file.


import android.content.Intent;
import android.os.Handler;
import android.support.v7.app.AppCompatActivity;
import android.os.Bundle;

public class SplashActivity extends AppCompatActivity {

    int SPLASH_TIME_OUT = 1500;

    @Override    protected void onCreate(Bundle savedInstanceState) {
        super.onCreate(savedInstanceState);
        setContentView(R.layout.activity_splash);

        new Handler().postDelayed(new Runnable() {
            @Override            public void run() {
                startActivity(new Intent(getApplicationContext(),HomeActivity.class));
                finish();
            }
        },SPLASH_TIME_OUT);
    }
}

Create one another activity named HomeActivity to open after Splash scree.

Sunday, 22 January 2017

How to send values using Intent

Hello Viewers in following example i'll show you how to send values using Intent.
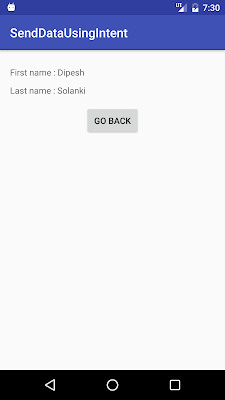
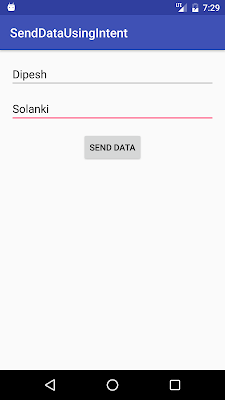
send data using intent

AndroidManifest.xml

<?xml version="1.0" encoding="utf-8"?>
<manifest xmlns:android="http://schemas.android.com/apk/res/android"
    package="com.app.dipesh.senddatausingintent">

    <application
        android:allowBackup="true"
        android:icon="@mipmap/ic_launcher"
        android:label="@string/app_name"
        android:supportsRtl="true"
        android:theme="@style/AppTheme">
        <activity android:name=".MainActivity">
            <intent-filter>
                <action android:name="android.intent.action.MAIN" />

                <category android:name="android.intent.category.LAUNCHER" />
            </intent-filter>
        </activity>
        <activity android:name=".SecondActivity"></activity>
    </application>

</manifest>

activity_main.xml

<?xml version="1.0" encoding="utf-8"?>
<LinearLayout xmlns:android="http://schemas.android.com/apk/res/android"
    xmlns:tools="http://schemas.android.com/tools"
    android:id="@+id/activity_main"
    android:layout_width="match_parent"
    android:layout_height="match_parent"
    android:padding="16dp"
    android:orientation="vertical"
    tools:context="com.app.dipesh.senddatausingintent.MainActivity">

    <EditText
        android:id="@+id/efname"
        android:layout_width="match_parent"
        android:layout_height="wrap_content"
        android:hint="Enter FirstName"/>

    <EditText
        android:id="@+id/elname"
        android:layout_width="match_parent"
        android:layout_height="wrap_content"
        android:hint="Enter LastName"
        android:layout_marginTop="10dp"/>

    <Button
        android:id="@+id/btnsend"
        android:layout_width="wrap_content"
        android:layout_height="wrap_content"
        android:layout_gravity="center_horizontal"
        android:text="Send Data"
        android:layout_marginTop="15dp"/>

</LinearLayout>

ActivityMain.java

package com.app.dipesh.senddatausingintent;

import android.content.Intent;
import android.support.v7.app.AppCompatActivity;
import android.os.Bundle;
import android.view.View;
import android.widget.Button;
import android.widget.EditText;

public class MainActivity extends AppCompatActivity {

    EditText fname,lname;
    Button sendData;

    @Override
    protected void onCreate(Bundle savedInstanceState) {
        super.onCreate(savedInstanceState);
        setContentView(R.layout.activity_main);

        //Find all views using findViewByid
        fname = (EditText) findViewById(R.id.efname);
        lname = (EditText) findViewById(R.id.elname);
        sendData = (Button) findViewById(R.id.btnsend);

        //set click listener on button.
        sendData.setOnClickListener(new View.OnClickListener() {
            @Override
            public void onClick(View view) {
                //getting both edittext values.
                String fnm = fname.getText().toString().trim();
                String lnm = lname.getText().toString().trim();

                Intent i = new Intent(getApplicationContext(),SecondActivity.class);
                i.putExtra("fname",fnm);
                i.putExtra("lname",lnm);
                startActivity(i);
            }
        });

    }
}

activity_second

<?xml version="1.0" encoding="utf-8"?>
<LinearLayout xmlns:android="http://schemas.android.com/apk/res/android"
    xmlns:tools="http://schemas.android.com/tools"
    android:id="@+id/activity_second"
    android:layout_width="match_parent"
    android:layout_height="match_parent"
    android:padding="16dp"
    android:orientation="vertical"
    tools:context="com.app.dipesh.senddatausingintent.SecondActivity">

    <TextView
        android:id="@+id/tvfname"
        android:layout_width="match_parent"
        android:layout_height="wrap_content"
        android:layout_marginTop="10dp"/>

    <TextView
        android:id="@+id/tvlname"
        android:layout_width="match_parent"
        android:layout_height="wrap_content"
        android:layout_marginTop="10dp"/>

    <Button
        android:id="@+id/btnback"
        android:layout_width="wrap_content"
        android:layout_height="wrap_content"
        android:text="Go Back"
        android:layout_gravity="center_horizontal"
        android:layout_marginTop="15dp"/>

</LinearLayout>


secondactivity.java

package com.app.dipesh.senddatausingintent;

import android.support.v7.app.AppCompatActivity;
import android.os.Bundle;
import android.view.View;
import android.widget.Button;
import android.widget.TextView;
import android.widget.Toast;

public class SecondActivity extends AppCompatActivity {

    TextView fname,lname;
    Button back;
    String fnm,lnm;

    @Override
    protected void onCreate(Bundle savedInstanceState) {
        super.onCreate(savedInstanceState);
        setContentView(R.layout.activity_second);

        fname = (TextView) findViewById(R.id.tvfname);
        lname = (TextView) findViewById(R.id.tvlname);
        back = (Button) findViewById(R.id.btnback);

        //check intent is null or not
        if(!getIntent().getExtras().getString("fname").equals("") && !getIntent().getExtras().getString("lname").equals("")){
            //get values from intent
            fnm = getIntent().getExtras().getString("fname");
            lnm = getIntent().getExtras().getString("lname");
            fname.setText("First name : " + fnm);
            lname.setText("Last name : " + lnm);
        }else {
            Toast.makeText(getApplicationContext(),"Intent is null",Toast.LENGTH_LONG).show();
        }

        back.setOnClickListener(new View.OnClickListener() {
            @Override
            public void onClick(View view) {
                finish();
            }
        });
    }
}

Wednesday, 18 January 2017

Get EditText Value

Hello Viewers in following example i'll show you how to get values from edittext and display it on Toast.


In this tutorial i have used three components EditText, Button and Toast where :

EditText used for get values from user.

Button used for set any action while user press it.

Toast used to display information for the short period of time.

how to get value from edittext

Add following code in activity_main.xml file :

<?xml version="1.0" encoding="utf-8"?>
<LinearLayout xmlns:android="http://schemas.android.com/apk/res/android"
    xmlns:tools="http://schemas.android.com/tools"
    android:id="@+id/activity_main"
    android:layout_width="match_parent"
    android:layout_height="match_parent"
    android:padding="16dp"
    android:orientation="vertical"
    tools:context="com.app.dipesh.getedittextvalue.MainActivity">

    <EditText
        android:id="@+id/etfname"
        android:layout_width="match_parent"
        android:layout_height="wrap_content"
        android:hint="Enter FirstName"/>

    <EditText
        android:id="@+id/etlname"
        android:layout_width="match_parent"
        android:layout_height="wrap_content"
        android:hint="Enter LastName"
        android:layout_marginTop="10dp"/>

    <Button
        android:id="@+id/btnok"
        android:layout_width="wrap_content"
        android:layout_height="wrap_content"
        android:text="OK"
        android:layout_marginTop="20dp"
        android:layout_gravity="center_horizontal"/>


</LinearLayout>

Add following code MainActivity.java file:

package com.app.dipesh.getedittextvalue;

import android.support.v7.app.AppCompatActivity;
import android.os.Bundle;
import android.view.View;
import android.widget.Button;
import android.widget.EditText;
import android.widget.Toast;

public class MainActivity extends AppCompatActivity {

    EditText fname,lname;
    Button ok;

    @Override
    protected void onCreate(Bundle savedInstanceState) {
        super.onCreate(savedInstanceState);
        setContentView(R.layout.activity_main);

        //find all view using findViewById
        fname = (EditText) findViewById(R.id.etfname);
        lname = (EditText) findViewById(R.id.etlname);
        ok = (Button) findViewById(R.id.btnok);

        //set click listener on OK button
        ok.setOnClickListener(new View.OnClickListener() {
            @Override
            public void onClick(View view) {
                String fnm = fname.getText().toString().trim();
                String lnm = lname.getText().toString().trim();
                Toast.makeText(MainActivity.this,
                        "Fname is : " + fnm + " Lname is : " + lnm
                        , Toast.LENGTH_LONG).show();
            }
        });
    }

}

Sunday, 15 January 2017

The Activity Lifecycle

As a user navigates through, out of, and back to your app, the Activity instances in your app transition through different states in their lifecycle. The Activity class provides a number of callbacks that allow the activity to know that a state has changed: that the system is creating, stopping, resuming, or destroying an activity.

To navigate transitions between stages of the activity lifecycle, the Activity class provides a core set of six callbacks:

Android activity lifecyler

Activity Lifecycle Diagram


1. onCreate : This method called when activity first created.

2. onStart : This method called when activity visible to user.

3. onResume :  This method called when activity interacting with user.

4. onPause : This method called when activity not visible to user.

5. onStop : This method called when activity not longer visible to user.

6. onDestroy : This method called before activity destroyed.

Activity Lifecycle Example:

public class MainActivity extends AppCompatActivity {

    @Override
    protected void onCreate(Bundle savedInstanceState) {
        super.onCreate(savedInstanceState);
        setContentView(R.layout.activity_main);
        Toast.makeText(this, "onCreate()", Toast.LENGTH_SHORT).show();
    }

    @Override
    protected void onStart() {
        super.onStart();
        Toast.makeText(this, "onStart()", Toast.LENGTH_SHORT).show();
    }

    @Override
    protected void onResume() {
        super.onPostResume();
        Toast.makeText(this, "onResume()", Toast.LENGTH_SHORT).show();
    }

    @Override
    protected void onPause() {
        super.onPause();
        Toast.makeText(this, "onPause()", Toast.LENGTH_SHORT).show();
    }

    @Override
    protected void onStop() {
        super.onStop();
        Toast.makeText(this, "onStop()", Toast.LENGTH_SHORT).show();
    }

    @Override
    protected void onDestroy() {
        super.onDestroy();
        Toast.makeText(this, "onDestroy()", Toast.LENGTH_SHORT).show();
    }
}


Monday, 9 January 2017

Installing Android Studio


  First you will to install JDK before insalling Android Studio.The Android SDK uses JDk to compile .java files to .class bytecode.

  The Android Asset Packaging Tool (aapt) takes your application resource files, such as the AndroidManifest.xml file and the XML files for your Activities, and compiles them. An R.java is also produced so you can reference your resources from your Java code.

Click below link to download JDK : 

http://www.oracle.com/technetwork/java/javase/downloads/index-jsp-138363.html

Android Studio : 

  Android Studio is the official IDE for Android. Android Studio provides the fastest tools for building apps on every type of Android device.

Click below link to download Android Studio:

To read Android Studio user guide click below link:

Saturday, 7 January 2017

Android Core Building Blocks

  An android component is simply a piece of code that has a well defined life cycle e.g. Activity,Receiver,Service etc.These components are loosely coupled by the application manifest file AndroidManifest.xml that describe each component of the application and how they interact.

Following are main building blocks :
  • Activity
  • View
  • Service
  • Broadcast Receivers
  • Content Providers

Activity :

Activity represents one screen for example login screen.An single activity is implement Activity class as follows:

public class MainActivity extends AppCompatActivity{
//block of code...
}

View : 

A view is single UI element, such as a Button,TextView,EditText etc.

Service :

  A service is background process which is run in background. To execute Service application not need to open it will runs when application is closed.for example playing music in background is one type of service, another example is show reminders.A Service class implemented as follows :

public class Service extends Service{
//block of code...
}

Broadcast Receivers : 

  Broadcast Receivers use to get broadcast messages from devices.For example,if your application register for the ACTION_BOOT_COMPLETED system event which is fired once the Android system has completed the boot process.

  To get broadcast messages your want to register your application into Broadcast Receivers by adding following code into AndroidManifest.xml file.

<application>
<receiver android:name=".AlarmReciever"/>
</application>

Following class which is extends BroadcastReceiver class:

public class AlarmReciever extends BroadcastReceiver{
//block of code...
}

Content Providers :

Content Provider are used to share data between applications on requests.

A content provider is implemented as a subclass of ContentProvider class.

public class MyAppContentProvider extends ContentProvider{
//block of code...

Additional Components:

Fragments : 
Represent portion of user interface in an activity.It is like part of activity. 
Intents :
        Intents mainly used to : 
- Start new activity
- Start service
- Open device application like email app,Phone Dial pad etc.
- Broadcast a message.
Following example start new activity within your app.

startActivity(new Intent(getApplicationContext(),SecondActivity.class));
AndroidManifest.xml : 
    AndroidManifest file is a heart of android application.It contains information about activities,services,permissions etc.

Wednesday, 4 January 2017

Android Platform Architecture

Android Platform Architecture

Android is an open source, Linux based software. Following diagram shows component of the Android platform.


The Linux kernel :

The foundation of the Android platform is the Linux kernel.Using a Linux kernel allows Android to take advantage of key security features and allows device manufacturers to develop hardware drivers for a well-known kernel.

Hardware Abstraction Layer(HAL) :

 The hardware abstraction layer provides standard interfaces that expose device hardware capabilities to the higher-level Java API framework. The HAL consists of multiple library modules, each of which implements an interface for a specific type of hardware component, such as the camera or Bluetooth module. When a framework API makes a call to access device hardware, the Android system loads the library module for that hardware component.

Android Run time :

For devices running Android version 5.0 (API 21) or higher, each app runs in its own process and with its own instance of the Android Run time(ART).ART is written to run multiple virtual machines on low-memory devices by executing DEX files, a byte code format designed specially for Android that's optimized for minimal memory footprint.

Native C/C++ Libraries :

Many core Android system components and services, such as ART are built from native code that require native libraries written in C and C++.The Android platform provides Java framework APIs to expose the functionality of some of these native libraries to apps.

Java API Framework :

The entire feature-set of the Android OS is available to you through APIs written in the java language. These APIs form the building blocks you need to create Android apps by simplifying the reuse of core, modular system components and services, which include following:

  • A rich and extensible View System you can use to build an app’s UI, including lists, grids, text boxes, buttons, and even an embeddable web browser
  • A Resource Manager, providing access to non-code resources such as localized strings, graphics, and layout files
  • A Notification Manager that enables all apps to display custom alerts in the status bar
  • An Activity Manager that manages the life cycle of apps and provides a common navigation back stack
  • Content Providers that enable apps to access data from other apps, such as the Contacts app, or to share their own data.

System Apps :

Android comes with a set of core apps for email, SMS messaging, calendars, internet browsing, contacts, and more. Apps included with the platform have no special status among the apps the user chooses to install. So a third-party app can become the user's default web browser, SMS messenger, or even the default keyboard (some exceptions apply, such as the system's Settings app).